 |
 |
Declination Drive Adjustments (without rebuild)
The following is a description of how to adjust the declination drive motor and worm mechanism. This should be done before consideration is given to rebuilding the declination drive bearings since it might improve performance enough to avoid the much more major rebuild process. The adjustments are in two parts. The first is a description of precision adjustment of the declination platform without modification of the mechanism. The second is a tactic that allows for high precision adjustment with a minor modification of the system.
All information supplied by Michael Hart, 13 May 1998. (editing and commentary by Doc G)
BACKGROUND
In an earlier MAPUG post, I described adjusting the worm carriage spring tension to minimize retrograde motion by REDUCING carriage spring tension just enough to lift the worm into contact with the worm wheel and NO MORE. The purpose of the carriage spring is to variably remove backlash in the Dec (and RA) drive. A small amount of carriage float is necessary to handle any eccentricity of the worm gear. The amount of carriage float is adjusted by the carriage set screw stop. If all of the float is removed with the carriage stop set screw, it is likely the worm will bind against the worm wheel at some point. The idea is to remove excessive carriage travel, but still allow for a bit of worm wheel run out.
I will describe a rather simple procedure I use to enable precise adjustment
of the Dec drive worm which usually allows excellent tracking of exposures
at the 3000 mm focal length. On my 12" scope, I found most of the
run out in the facing between the inside Dec clutch plate and the 1" optical
tube shaft. The carriage spring easily handles this, but extra tension
not needed causes retrograde motion. I was able to selectively add
or remove retrograde motion by increasing or decreasing carriage spring
force. If the Dec drive is excessively noisy or retrograde motion
is experienced, reduction of carriage spring force can help.
RETROGRADE MOTION -- DO I HAVE IT?
For those unfamiliar with retrograde motion, this describes a drive
(usually the Dec drive) that moves a bit in the opposite direction selected
by the keypad. (before resuming in the correct direction) This is
best observed at moderate to high power with a reticule eyepiece.
Autoguiders are confused by retrograde motion. In effect, a small
oscillation is set up as the autoguider program attempts to correct for
retrograde anomalies. (in fact, guider software has great difficulty
when this problem exists - ed) This motion should not be confused
with backlash which is do to a normal mechanical problem with the gearing
system and which can be corrected with the backlash setting provided in
the LX200 software.
ADJUSTING THE WORM and WORM CARRIAGE PIVOT
Proper worm carriage pivot (hinge) adjustments allow weaker carriage springs to do a better job of reducing backlash without adding retrograde motion. In practice, I adjust the carriage pivot set screw (which presses on a ball bearing) for a tiny bit of resistance to the weight of the carriage assembly (worm, carriage, gears and motor) and applied a drop of oil to the ball bearings. For the earlier post, I removed excessive spring force by compressing the spring fully several times with a pliers. I balance the optical tube (weights not necessary, but useful). Then, I installed the Dec drive using the two machine screws loosely tightened. I held a straight edge up from the center of the wormhole to the center of the fork arm and centered the worm and marked the point on the Dec drive just below the worm wheel. This point was used to locate a screwdriver (small lever) to apply a bit of pressure under the Dec drive assembly directly under the center of the worm wheel. Finally, I rocked the Dec drive assembly against the worm wheel to find and feel the precise point the worm properly engages the worm wheel. Carriage travel is adjusted to allow just enough travel to allow a typical range of expected declination positions.
This process is MUCH easier than writing it here- total time to adjust the Dec drive is under 3 minutes with experience.
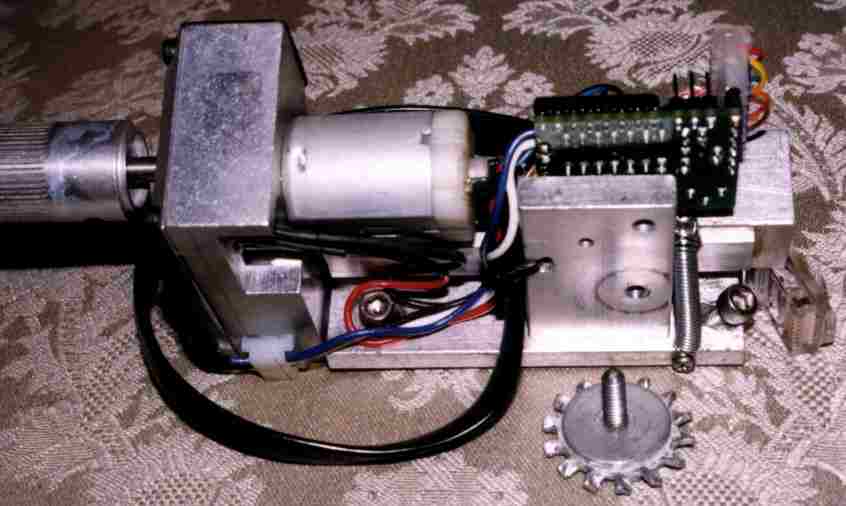
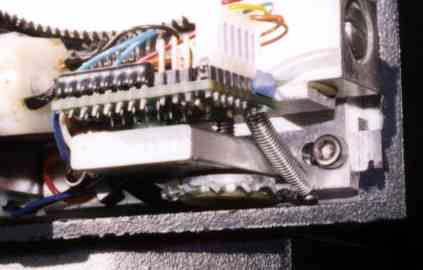
For detailed photographs of the deck drive Press Here
TIGHTENING THE WORM TO WORM WHEEL SETTING
It is possible to make a small modification to the declination drive
platform which allows for precise adjustment of the drive for a specific
setting of the declination of the telescope. The principle is to
tighten the worm to worm wheel contact for a small and specific section
of the worm wheel. When this is done one does not have to use
a carriage spring at all. The concept is that when guiding
for imaging, the declination changes very little and so the worm moves
over a very tiny portion of the worm wheel. This
means the drive carriage can be adjusted optimally for the particular section
of the worm wheel in use. Thus, I fabricated a manual
carriage adjusting screw that is tweaked for a very specific range of
declination position. In this way, I am able to eliminate all retrograde
motion as well as minimize backlash for the long guiding times that are
required for tricolor filter imaging sequences. The technique is
quite simple. I check and adjust the declination drive platform platform
tension during a short slew about the declination setting that is to be
used until motor noise JUST increases. This indicates that the contact
between the worm and worm wheel is snug. With this setting correct,
at high power (600-800X) no retrograde motion should be observed and the
scope should return to the same spot if bumped slightly. Manually
rocking the optical tube verifies the setting, in practice this minor tweaking
is quite easy to do but requires a modified setting screw as described
below..
.
FABRICATING A DEC WORM TENSION ADJUSTER SCREW (Photographs below)
In order to carry out this precise adjustment of the worm carriage, it is necessary to replace the carriage adjusting screw with a new screw that has a large diameter head that can be easily reached from the side of the dec drive housing. (Through a slot cut in the side of the housing.) The required screw will have a short threaded section topped with a large diameter knurled section. It will look like a short, fat thumb screw. (I would, and probably will, make such a screw on my lathe. But Michael has a way of his own. - ed.) The manual worm platform adjusting screw was made from am 8-32 X 5/8" hex head machine screw with the tip sanded round. This screw was inserted through a 1/8" X 3/4" fender washer. A 5/8" external toothed lock washer was glued to the fender washer as was the hex screw. The teeth stick out past the fender washer and allow my finger to grip it for fine adjustments. I used two part plastic cement (Devcon brand) which is as strong or stronger than epoxy, waterproof, and sets up in 5 minutes. Enough material was used to encase the hex head and was sanded almost flush with the hex screw head as it must rotate in a rather small space between the dec drive platform and the fork arm casting. The fabricated adjusting screw replaced the regular adjusting screw. A knife was used to the trim away a bit of the plastic dec drive cover to allow access with a small screwdriver (used as a push tool). I removed a bit more on mine to allow access with my thumb.
Of coarse, precise balance is maintained and the full potential of low
friction dec roller bearings (if used) are best realized with the outlined
adjustments. Those looking for a reason to buy another mount should
avoid the above procedures, however, those with demanding imaging requirements,
which exceed LX200 design parameters, may want to consider implementing
the outlined adjustments.
 |
 |